When it comes to hobbies, learning to play the guitar is a fairly popular one, and once you learn, you can even make money as a professional musician.
In fact, the guitar has experienced a growth of 28 percent when it comes to overall sales.
As a semi-casual guitarist myself, I can attest that there’s nothing more rewarding than perfecting a lick that you’ve been working on for days.
The instrument is also versatile; you can play a wide variety of genres, and each has its own style and patterns to master. Still, it can be a bit daunting when you want to learn because there’s a whole world of techniques to master.
For this reason, I decided to create this guide so that you can understand the basics of learning how to play guitar.
Also Read: Fender Play Review
Contents
The Basics
When you’re first learning the guitar, it’ll help to learn things like the components of a guitar, the types of guitars you’ll find on the market, and what makes one guitar sound more resonant or brighter than another.
Anatomy of a Guitar
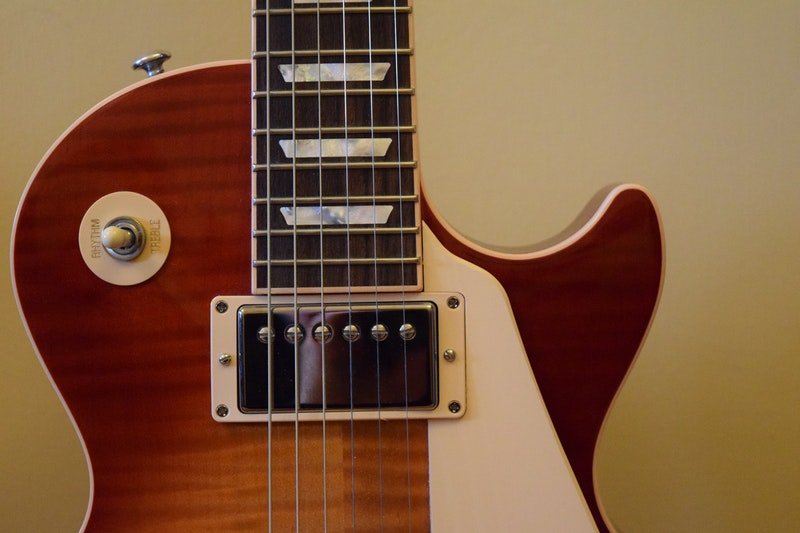
No matter what guitar you want to play, it’s a good idea to understand that each instrument shares certain traits with just about all guitars. Let’s take a quick look at the standard features:
 The Neck: The neck is the part of the guitar that hosts the frets. When purchasing a new guitar, it’s a good idea to have a bridge that’s easy to slide your hand on so that you can fret with relative ease. Each bridge is different, and the length varies based on the fret size or the number of frets on the instrument.
The Fretboard: This is where you’ll be playing your notes. The frets on the fretboard are rectangular, and when you want to play a note, you’ll depress the string nearest the metal fret to create a sound. The most common fretboard material is mahogany.
The Body: This is the component of the guitar that will come into contact with your trunk and a sizeable portion of your strumming arm. The strings are affixed to the body of the guitar at the bridge, and the method by which this is done will vary from instrument to instrument.
The Headstock: This is the crown of the guitar, and this is also the place where the strings are attached to the metal tuning pegs. If you have a six-string, in most cases, you’ll have a headstock with either a 3+3 or a 6-in-line design. This is primarily a stylistic choice, so pick the one that resonates with you the most. To tune a guitar, you simply rotate the strings upwards or downwards.
Types of Guitars
Acoustic
This is the granddaddy of the guitar, and if you want a beautiful traditional sound, a good acoustic is the way to go. In just about every case, an acoustic guitar has a sound hole and a hollow cavity to generate a fairly large sound.
These also come in a wide variety of shapes and sizes. Some types of acoustic guitar include concert, dreadnought, grand auditorium, or even travel acoustics.
Electric
In most cases, these are solid-body guitars that don’t have sound holes like those found on acoustics. When you strum the strings, the metal generates a radio signal which is then pumped through the pickups. While there are a few different types of guitar pickups, they each allow the analog strum to be ferried through a guitar cable so that it can be amplified.
Tonewoods
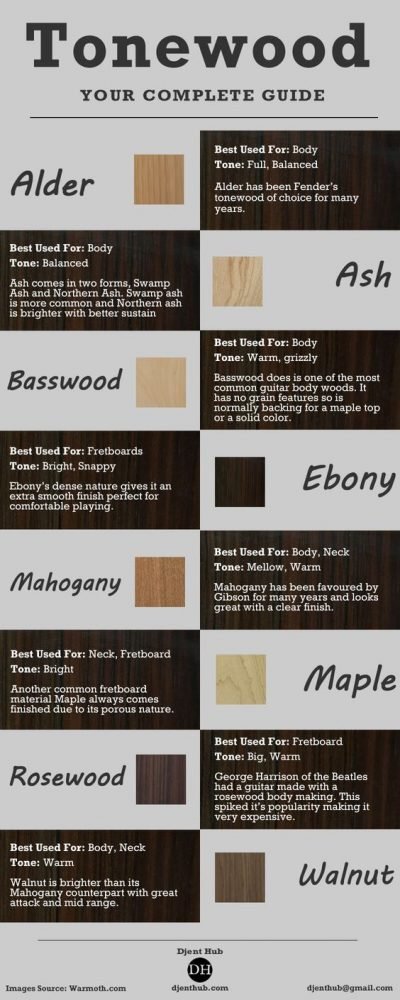
For all guitars, the tonewood decides the overall sound, and as a rule, the more expensive tonewoods sound the best. Tonewoods can vary from alder to mahogany, and finding the right one for your sound can be very beneficial to your overall playing. Still, if you’re just starting, you can consider cheaper tonewoods until you’re ready to branch out.
Posture is Important
Before you begin working on any other aspect of the guitar, you should consider your stance. This is a part of learning where you can establish some bad habits early that can mess up your progress and even cause injury!
When playing, always sit up straight. I suggest using a straight-backed chair or stool to get yourself into the habit of sitting up straight. Secondly, a chair or stool with a footrest that you can use to elevate a knee can be helpful so that you can rest the nape of the body comfortably.
While using a more massive guitar like a dreadnaught may require a different posture, in most cases, I suggest positioning the guitar so that the neck is upward at an angle. This will just feel more comfortable, especially if you’re going to be playing for a while.
When it comes to how to hold your instrument, gently rest the back of the neck in the space between your thumb and forefinger. Never hold too tight – you want to be able to slide easily. A bit of discomfort is standard in the first days of learning, so don’t sweat it, your muscles will acclimate.
Tuning Your Guitar
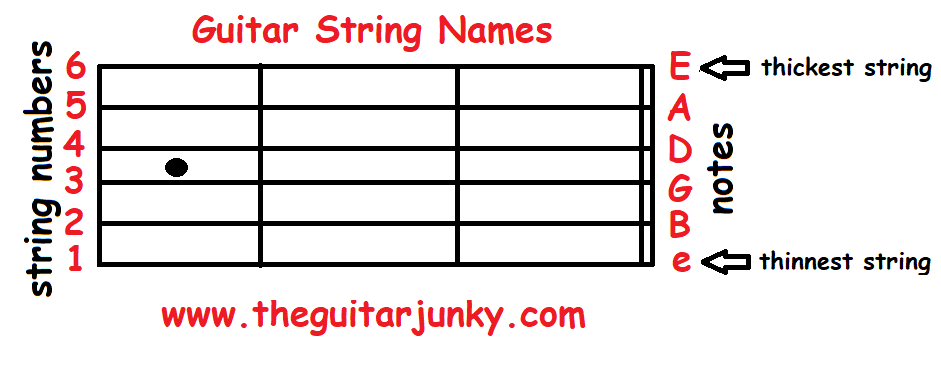
From time to time, you’re going to have to tune your guitar so that you can play your notes correctly. One of the most frustrating things is hearing your chords sound “off.” Proper tuning will also require that you know the name of each string, which includes E, A, D, G, B, and E.
For me, the easiest way to learn these was by the mnemonic of
“Eddie Ate Dynamite. Good Bye Eddie.”
I’m sure you noticed that two of these strings have the same name – this is because the thickest string is an octave higher than the thinnest, but they are the same note. For this reason, the thickest is usually referred to as E and the thinnest as high E.
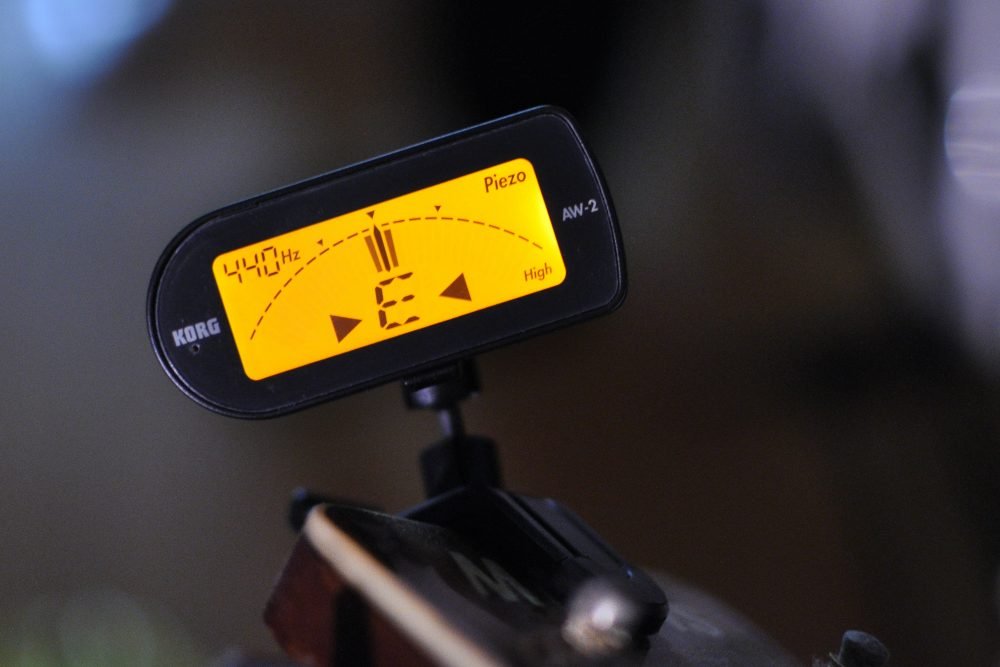
When you’re ready to tune, there are a few methods that you can use to find a standard tuner, but many musicians prefer the kind that attaches to the headstock of your instrument. These clamp on like a capo and are very convenient.
You can also opt to use an app tuner, which is a method I use from time to time. With an app tuner, you can strum each string, and the microphone on your device will automatically determine which string you’re playing.
As you work through each string, an indicator will determine if you’re too sharp or need to sharpen up the note. These software options also sometimes have multiple tunings, so if you’re looking for a grunge-friendly drop D tuning, you can command your app to show you how to tune your instrument that way.
Also Read: How to Play Electric Guitar Through Headphones
The Capo
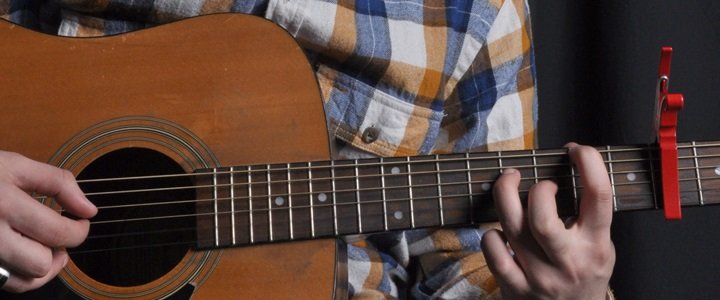
From time to time, you’ll encounter a song that requires a capo, which effectively will allow your notes to play at a higher pitch.
This includes open strings, so it can be beneficial, especially if you don’t want to retune. The capo attaches to any fret, so if you want to experiment with sound, this is a good option.
Getting Used to Fretting
Playing the guitar is a group effort that requires you to synchronize both of your hands. For this reason, fretting is just as crucial as strumming. To play optimally, you should train the muscles in your hands to be as dexterous as possible so that you can hit the strings easier.
Fretting requires that you press the note as close to the bridge side of the fret as possible. If you ever hear a bit of buzzing, that means that your finger isn’t quite as close to the metal fret as it could be.
Also, when you’re working on your stretching, it’s a good idea to incorporate your pinky – a common issue with newer guitarists is that they will try to play with only the first three fingers, which is a practice that will work against your progression as a guitarist.
To get into the habit, just move up and down the fretboard with your fingers and practice just tapping an increasingly diverse number of frets. Always make sure to move vertically from string to string, and you’ll start to become more natural in your playing.
Vibratos
When you are fretting a note, you can move the string up and down with your fingertips to create a vibrating tone. This is called performing a vibrato, and it can add a lot of expression to your notes.
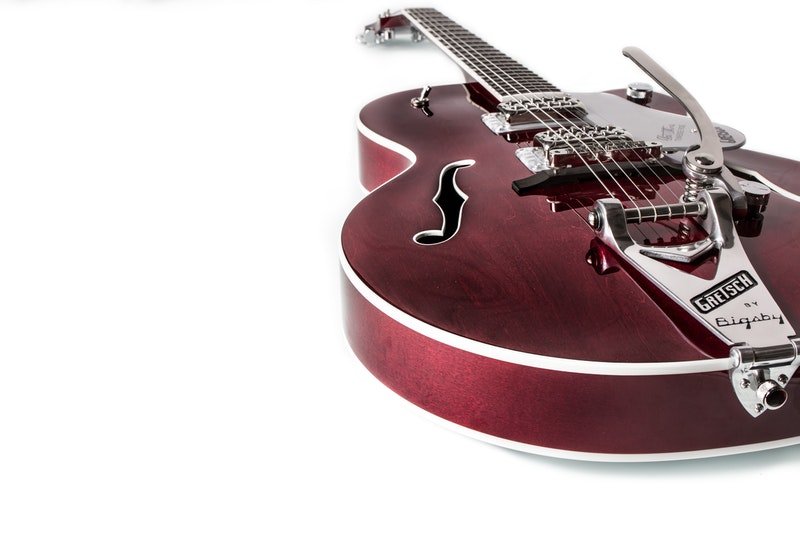
Some electrics and hollow-body electrics even include a “whammy” or vibrato bar, which you can vibrate with your strumming hand for a similar effect.
Picking 101
For most new guitarists, the pick, which is sometimes called a plectrum, is where to start. This small device, which is tear-shaped and usually made of a flexible material like plastic or celluloid, can help your notes ring out very clearly.
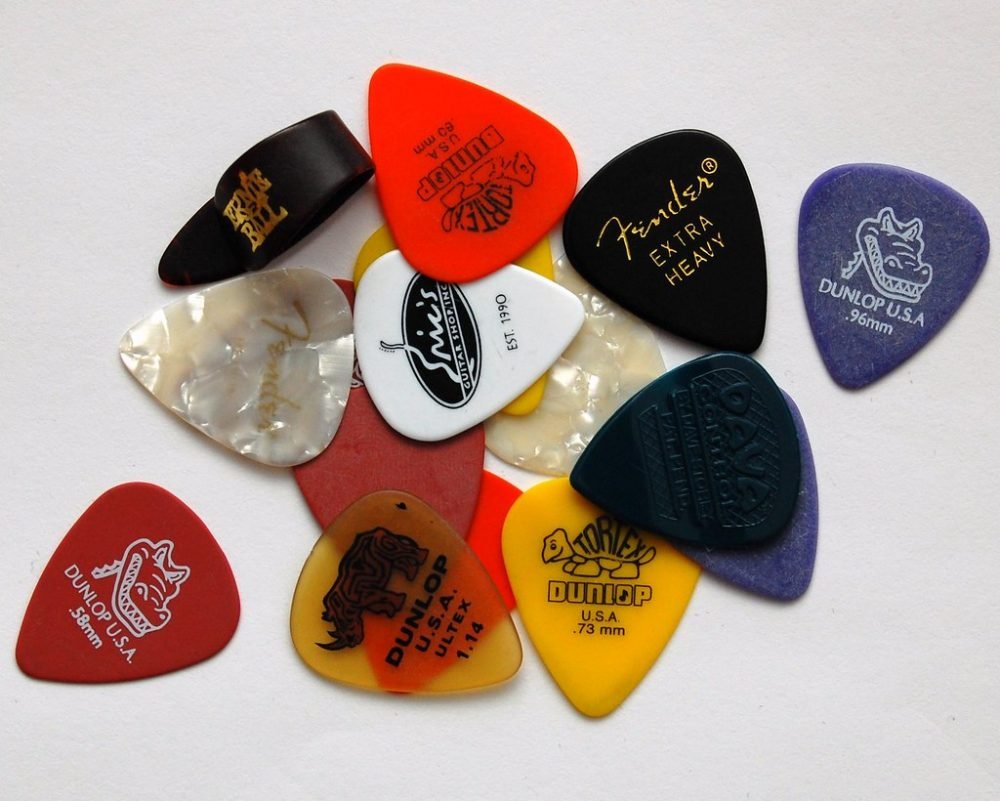 A good pick can be very cheap; in fact, you can usually get several in a pack for just a few bucks.
I find that it’s also a good idea to experiment with pick thickness since some guitar playing sounds better with more flexible picks and vice versa.
To pick effectively, make a reasonably relaxed fist with your strumming hand and cradle the pick between your thumb and your index finger. Next, while pointing the tip at a slight angle, move the pick up and down on the string. Ideally, you don’t want too much of the tip exposed so that you can have a good grip on the plectrum.
Advanced Picking Techniques to Eventually Learn
Picking is very varied, especially at more advanced levels. For example, here are a few techniques that you can work on when learning:
Tremolos: Using a slightly altered attack angle, you can pick very quickly so that the triangular shape of the plectrum makes up and down motions easier. This is called performing a tremolo, and it’s a staple of some genres of music.
Pinch Harmonics: If you like the “squeedlies” of rock bands like “RUSH,” then you can try pinch harmonics, which require you to use the very tip of the pick and the meat of your thumb to execute a higher-pitched note. This takes a lot of practice and amplification is crucial.
Finger Strumming
So, which is better – strumming or picking? According to Hear the Music Play, both have their advantages. When you pluck with your fingers, you’ll be able to hit chord notes simultaneously. This can be very different than picking since picking only allows you to hit single strings in a rapid progression.
At first, most musicians only learn to use their index and middle fingers to finger strum, but as you progress, you’ll start to incorporate just about every finger on your strumming hand.
To get started, you can use the bassist’s technique for finger strumming, which has you rest your thumb on your pickup and use the first two fingers of your hand to gently pluck the strings.
As you progress with this technique, you can switch it up and use your thumb to handle the E and A strings, and the remainder of your fingers to strum the D, G, B, and high E strings.
Chord Mastery
For true guitar mastery, you’ll have to learn how to combine single notes into chords. Chords consist of three or more notes played in a grouping. Usually, with picking, you’ll play them one-after-another, but with fingerstyle, you can strum these strings simultaneously.
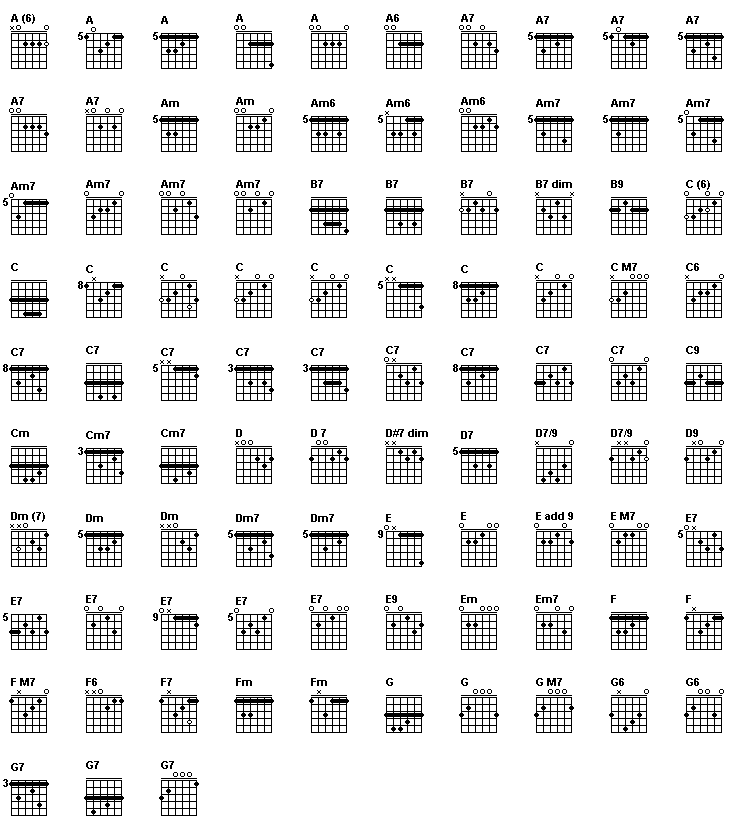
It’s also important to understand that some chords require you to incorporated unfretted single open notes, which really will broaden the versatility of your sound. As a general rule, you’ll want to practice only hitting the strings in a chord since this will make your play more accurate.
Finger Placement is Essential
According to GuitarHabits, there are about eight different chords that beginners should learn, and many of these make up some of the essential chords from some very popular songs. It’s a good idea to develop good habits with these chords, so position your fingers appropriately and avoid hitting too many notes with a single finger simultaneously.
When learning some of the most basic chords, it’s a good idea to try to fret them as fast as you can. This will help your fingers develop muscle memory so that you can return to the most common finger shapes with a high degree of accuracy.
Let’s take a quick look at how you should position your fingers when fretting some of these more straightforward chords:
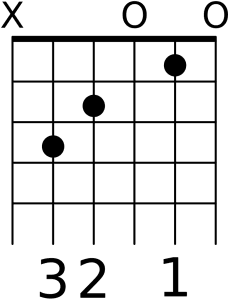 C: For this chord, you’ll want to position your index finger on the first fret’s B string. Next, place your middle finger on the second fret of the D string and your ring finger on the third fret of the A string. Effectively, the G should be played open and the two E strings ignored.
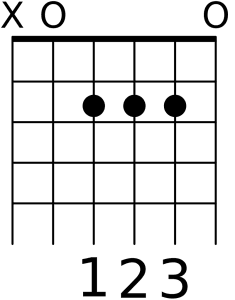 A: While it may seem easy to just rest one finger across the three strings of this chord, it’s just better to develop the habit of hitting them with your index, middle, and ring fingers. Fortunately, this is relatively easy and only requires that you position all three digits on the second fret of the D, G, and B strings. Start with the index finger at the topmost string and work your way down.
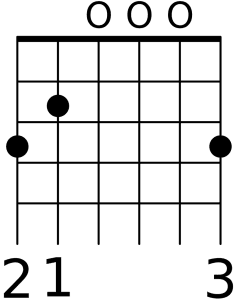 G: This chord seems complex, but in my experience, it’s very easy to get used to. Also, you’ll hit every string when you strum this one. To start, position your index finger on the second fret of the A string. Next, your middle finger should be resting on the third fret of the E string, and your ring finger should be doing the same on the high E version of this fret.
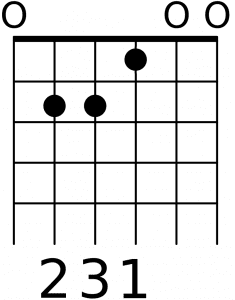 E: For good habits, always use three fingers, not two, for this chord. First, start by placing your index finger on the first fret of the G string. After this, put your ring finger on the second fret of the D string. Finally, place your middle finger on the second fret of the A string.This should feel very natural, but getting used to stacking the two fingers atop each other can take time.
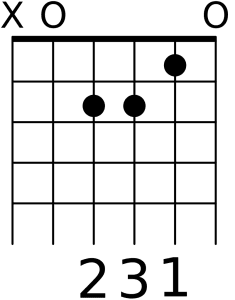 A Minor: This chord is very similar to E, but in this case, you’ll just be shifting your fingers down a position so that your index is on the B string, your ring finger on the G string, and your middle finger on the D string.
Precision Techniques Are Important
I can’t emphasize enough how vital proper finger placement is. First, you’ll always want to ensure just your fingertips are hitting just the tips of the strings. This will help you avoid accidentally muting the strings with the meat of your fingers.
Also, if you’re getting that muted sound, you could be accidentally fret-hand muting the note. If you’re getting this, then most likely, you need to apply just a little more pressure to the string. I’m not saying to press your fingers into the mahogany – just add a little more pushing power to the string so that it can ring out resonantly.
Another way to work on your hand positioning is to use a mirror. While holding your guitar, can you see the entirety of your wrist while you fret? If not, then most likely you’re not using the very tips of your fingers to play. Adjust your hand so that you can see more of your wrist.
Also, as you know by now, practice makes perfect. Check out this video, which provides you with several technique exercises that can help you develop technique.
Work on Relaxed Strumming
As you learn, you’ll want to get your wrists and forearms used to the action of strumming. Strumming usually includes both up and down motions, so you’ll want a high degree of efficiency for the best results.
Ideally, you’ll want to hit the strings that are part of the chords you’re aiming for without tiring your arm out. Strumming should also be an action that happens primarily at the wrist, but your elbows can move slightly.
Learning How to Play Using Tablature 200
So, now that you know some of the basics, how do you go about learning your favorite songs? This is where tabs come in, and with the internet, you can usually find the tabbed version of just about any favorite song.
Basic Guitar Tabs
When looking at a standard tab, it may take a minute to really understand these sometimes funny-looking diagrams.

In most cases, the standard tab represented on most online sources like Ultimate-Guitar are represented by dashes, numbers, and letters that correspond to the fret, the string, and whether the string is open or not. For example, when playing an E chord, the three strings will be represented by a single line on the diagram:
- The first fretted string would be represented by a one on the G string.
- The same line would also feature a two on the D string, which would indicate that you’ll need to fret the D string on the second fret.
- Finally, on that same line of the tab, you’ll also see another two on the A string, which means you’ll be fretting the A string on the second fret.
- Any 0’s or x’s represent whether the string is played open or avoided altogether.
Tabs don’t usually represent finger positioning, which is generally up for interpretation, but for a apples to apples representation, these are a good option for learning specific songs.
Similarly to how you can find apps for tuning, there are also smartphone apps on the market that can provide you with access to multiple tabs that you can use for learning. Additionally, for those looking to learn songs, games and apps like Yousician and Rocksmith are pretty good at teaching specific songs.
Tips on How to Keep Up Progression
Practice Daily: Even if you only spend a few minutes working on chords and notes, the muscle memory work can be instrumental. Just 30 minutes a day is all you’ll need for real progression.
Use Internet Tools: There are a ton of videos on YouTube, tabs for learning songs, and forums out there for new guitarists. Check each out for a full-fledged experience.
Consider Formal Lessons: While employing a professional guitar teacher will cost you some cash, it can have a massive impact on your playing, so consider this if you get stuck. View our free guitar lessons here.
Stay Open-Minded: Guitar playing is an art, not a science, so find the techniques that help you learn. This will take a bit of trial and error, so don’t get discouraged.
Final Thoughts
I hope that this guide has provided you with the tools you need to become a great guitarist. Learning to play the guitar can be very rewarding, but it does take time to develop into a musician. Fortunately, the practice itself is very fun and exciting, and there’s nothing quite like playing through an iconic lick that seemed impossible just days before.
